Wednesday, March 12, 2014

Assignment 6 - Synthesis!

Hello fellow students!

My name is Hans Hendriksen, I'm from Chicago and this week my lesson will be about Synths.

Synths got smaller over the years...

Thank you for taking the time to read it, and i hope your assignments this week will go well.


Since there are so many synths to choose from, i will show and explain the interfaces of four
synths that i have been working with and like.

Basically all synths have more or less the same parameters, and it is usually small variations
that make two synths sound completely different.
But the main structure of wave forms that get modulated to get a desired sound is all the same.
It has been like that since the synth has been around.


Basically a synth is built up in 5 module groups, or 4 + a tone generator/wave generator.

 In this figure the LFO ( Low frequency oscillator) is placed before the VCO( Voltage control Oscillator)
but the sound itself gets created by the VCO of course. After the waveform is created, it passes the 4 modules before it leaves the synth.

LFO   =( Low Frequency Oscillator)         =  Moves the sound in a very low frequency
VCO  =(Voltage Controlled Oscillator)      =  Creates the waveform
VCF  =(Voltage Controlled Filter)             =   Filters the waveform.You usually see a low pass filter by
                                                                      default because of the bright nature of waveforms.
VCA  =(Voltage controlled Amplifier)        =   Amplifies the waveform (Amplitude)

ADSR=(Attack, Decay, Sustain, Release)  =  Controls what a tone does over time, shapes notes


Synths weren't much different in 1972!

As you will see in the next four images, these controls are basically the same in all synths.


As you can see, the structure is still the same. Of course these days it is much easier to apply all
sorts of other effects/ patterns/sequences to the waveform in the synth.Most synths have built in appregiators etc...
The very great thing is that after the sound leaves the synth it can be further edited/modified with all the plugins and software that is available to us. The modulation never really stops:)

I really hope you enjoyed my lesson! I can't believe it's the last assignment already. Hope everybody will do well with the final exam!

Hans Hendriksen


Wednesday, March 5, 2014

Assignment: Algorithmic and Convolution reverb

Hi fellow students!

My name is Hans Hendriksen, im from Chicago and this is my 5th assignment for the
course Introduction to music production.

This week my topic will be convolution and algorithmic reverbs. I will explain how they work and function, as well as show the differences between the two.


   recording IR's for convolution reverb.. 


...and programming an algorithmic one.


Reverb is a very commonly used effect. It's not just useful to give audio a sense of "space"
but it can also "color" the sound, give it character.
There are several ways people create reverb, and i will focus on the two above mentioned.

What is reverb?

To understand how these reverb methods work, you first have to understand what reverb is.
Reverb comes from the word reverbaration.

Reverbaration is a collection of sounds reflecting from a surface or enclosed space. Very simply: your living room, as well as your bathroom, car and oven all have specific reverbarating sounds.
If the surface it bounces off of is smooth, it will have a different effect than for example a brick wall.

You are probably sitting in front of a monitor or laptop reading my blog now. Imagine that if you say something, the sound will move to the monitor and bounce straight back to you. 
This is called direct signal or direct sound. The soundwave reaches your laptop, bounces back and enters your ear. 
Of course sound goes in all directions. So when it hits the wall behind your laptop, it bounces back as well but it will probably not reach you again in a straight line, but indirectly, bouncing off several surfaces.
These indirect sounds are called early reflections. The early reflections will take longer to get to your ear than the direct signal, so the eventual result will be slightly delayed. This mix between reflections and direct sound will give the listener the sense of reverb. It gives you an idea how big an area is, whether it has stone tiles or wood paneling on the walls.
Very often you can tell the type of space you are "in" by listening to the effect.


Convolution Reverbs

In a convolution reverb the reverb engine ( usually in the form of a plugin ) places samples "over" 
the existing audio signal. These "samples" are called Impulse Response. ( IR)
If you dissect that word, Impulse would be the sample, and response what a sound does ( how long it takes) when it is reflected on a surface.

So an impulse response is how a given sound "reverbs" in a room, space etc.

Convolution reverb uses that method. Sounds are being recorded in a space, and sampled and used in a reverb unit or plugin. The plugin will set the parameters of the IR . In a way the IR file could be compared to the Meta information of audio files. It contains certain information and instructions what to do with that information once it reaches a plugin.

If you use that impulse response ( sample) over your own audio signal, you place the characteristics of a given "space" over your own signal, thus creating a specific reverb effect.

Often convolution reverbs work with a lot of presets like "hall", "room", "church", etc.

You can, usually for creative purposes, edit these presets. 

Here, in my opinion, is where the weak point of a convolution reverb becomes obvious. It's flexibility. 

You can usually edit common parameters in convolution reverbs, but unless you want to experiment with unconventional sounds it usually doesn't work. Why?
Because the Impulse Response ( Sample) loses its integrity once you change certain parameters. And with that the effect quickly becomes confusing, rumbly, even distorting. The best way to use these type of reverbs is to use the presets as they were intended and using that characteristic in your mix.

Another potential problem is the cpu power these plugins use. In a way they are "samplers" and it takes a lot of resources to use them in realtime as insert or even as an auxilary send into your tracks. I use them very sparingly and usually as a send over the mix. 

The advantage is the quality of the reverb. Software companies go through great lengths to carefully record 
these IR's and the results, when used right, are often stunning. 


Algorithmic Reverbs

The Algorythmic reverb is widely used in most DAW's, and usually are provided as a standard effect included in the software. They almost function as a synth in that they modulate a signal with mathematical algorythms that can be manipulated.
An algorythmic reverb uses several delay feedback signals to create a reverb effect. It uses a method where it simulates early and late reflections using algorythms. This gives an abundance of parameters to play with and nearly any representation of reverbaration can be made using an algorithmic reverb.
Usually the early reflections are represented as a group of parameters and late reflections or simply "reverb" in another.
Common parameters are: * Input level
                                       * Room Size
                                       * Predelay/delay
                                       *Dry/wet mix
                                       *Depth


Examples of different digital reverb interfaces with common parameters


The big advantage with algorythmic reverbs is their flexibility. Since it simulates relections of sounds that are practically always unique, it has to be able to create basically any type of reverberation.
Compared to convolution reverb these plugins are usually very cpu friendly.
Disadvantage is that the reverb quality isn't as realistic and good as convolution reverbs.


I hope this lesson was useful and clear to you, thank you for reading it.
Good luck with your assignments and for later on good luck with your exams!

Hans Hendriksen

Wednesday, February 26, 2014

Reducing acoustical and electrical noise during recording

Hi!
My name is Hans Hendriksen, I'm from Chicago and this is the 4th assignment for the course
Introduction in music production. Time is truly moving fast, already my 4th assignment!
I really like reflecting on my own recording situation in my assignments because hopefully it will show my progress.

This assignment will be no different! Noise reduction before recording is very important for me because it is coming from every angle in my place!

REDUCING ACOUSTICAL NOISE

-Always start with listening! Walk around in the room and try to really determine where your ears receive
the most and least noise. These can be coming from different sources, but they can be more pronounced in other parts of the room because of echoeing and bouncing of noise. replacing objects can change that again as well, so it is usually good to keep things the way they are once you are happy with your set up.


-Give your ears time to get used to lower volumes. If you walk in from a busy street your ears take time to adjust to both the space and noises in a room.


-A very useful tool I use these days is a decibel meter. I have an app on my phone that uses the mic in my phone and with that I walk around locating noise. An average of 35-40 db is not unusual in a normal room.

-I cover the two windows in my recording space with curtains when i record. Curtains always slightly move when a sound reaches them so that takes the energy out of most of the soundwaves, thus removing unwanted incoming sounds.

- I make sure radiators, AC's, tv's & radio's, phones etc., anything that is designed to make sound, are turned off.

-I try to record with a directional microphone. I usually use a microphone with a cardioid polar pattern.
This means i have to carefully place the microphone in front of the instrument i want to record, while it reduces sounds coming from the back or sides.

- Place the microphone close to the instrument or source of recording. This effectively means you can give it
   less microphone pre amp input, which is another reduction in noise build up.

-If you can and if your schedule allows it: Record at night! Everything gets a little more quiet at night.
 There is a lot less ambient sounds around during the night, like traffic and media from devices for example.
It also almost feels like it is easier to determine very low sounds at night, which will help to further reduce them.

 REDUCING ELECTRICAL NOISE

Everything electrical makes noise! Sometimes even when it's not turned on!
Reducing electrical noise for me starts with a simple rule: turn it off/ don't use it if you don't really need it!
Every electrical device creates self noise in varying degrees
Make sure you check your gears' self noise, which you can usually find in manuals or packaging.
If you add all the numbers it really gives you an idea how much noisefloor you are usually dealing with.
 

- So the first thing to look at is the source and signal flow itself. If you use a microphone to place in front of an amp to record that, it will create a few potential problems.

First of all your amp, when recording guitar or bass. If you use a lot of "drive", you will notice that it also will make unwanted noises louder. It is in fact another gainstage, something you want to use less to lower the noise floor.
Cables that crackle and pop, channels that buzz, feedback from your guitar...etc.
Sometimes for me it is more efficient to use a direct input into my signal processor, and then modify that once it reaches my DAW. It reduces the amount of devices i have to use. It's something to consider when trying to reduce noise.

-Use good gear. Cheap microphones make a lot of noise. Cheap devices will as well, both usually because of the way they're built. 


 - Use the shortest route to your DAW. Short, preferably balanced  TRS or XLRcables that are working well and have a thick shield cover. If you use TS cables keep them below 10 ft.
                                                                                        
-Electrical devices make noise because the powergrid they use is an alternating current (AC).This gives a hum ( also called mains hum) that gives off a 50 to 60 Hertz buzz. This is ( although in every day life barely noticed) a very audible noise and can be reduced by staying away from and switching off those devices.

 Reduce the amount of gainstages. Every "boost" of amplitude will also mean a boost of the noisefloor.
If your gainstages are in unity, the noise will reduce as well.

Some last tips:

Check your gear! Switches, uncut strings, wobbly whammy bars: everything can become part of unwanted noise. Before you press record you want to make sure everything is working well.
Don't use instruments with long effects chains attached. They all create self noise and add to the noisefloor.


Well, i hope this lesson was of use to you, i enjoyed writing it.
Thank you for taking time to read it, and good luck with your own assignment!

Hans Hendriksen


Wednesday, February 19, 2014

Assignment 3 - Automation in Cubase 5

Hello Everybody

I am Hans, I'm from Chicago and i am taking this course because i want to expand my knowledge about home recording. So far the lectures and material have been great, i am learning a lot.
I hope all of you have the same experience!

Thanks for taking time to look at my blog, i have come to appreciate how much time it takes to look at all these different assignments. Your attention is much appreciated.
Apart from the assignment this week, in which i'm going to talk about automation in Cubase,
i have posted all my assignments on the same blog. If you are interested, take a look at my other posts
if you are interested in working with Cubase. Hope you like it.

Now for the assignment.

Automation in Cubase is GREAT! It is a great tool for a lot of reasons, and i will show you some of those advantages.
Although automation behind the scenes does a whole lot, making it work and applying it to
your projects is really very simple in Cubase.

For this lesson, lets assume i want to add some panning for a recorded (semi) acoustic guitar.
I know there are ( in most DAW's) auto-pan functions available, but i just want to pan it left and right
for part of my recording, to add a natural "feel" of space.
You could call it "riding the panner".

                                                   First, let me show you the track(s):

 These are the same source, the upper track is a Direct input of my hollow body's pickup, the second track is a microphone recording of the same guitar. Recording like this gives me great creative options, because i can make the guitar sound completely different with just a few changes in volume or panning on either of the tracks. If you have ever recorded this way, you know what i mean.
Apart from changes to the sound , i can change the stereo image of the guitar sound.
This is where automation is a great tool. You can not only change parameters, you can also decide
when you want to change them.

Next i open the automation bar, simply by clicking a little button underneath the track:


We now see a slightly bigger version of our track, which will show the automation on the track.

This is very non destructive editing. Automation can simply be turned on and off at any time, and there is always the undo button. So a great tool to experiment with.

To turn on automation and have it "record" what you do, simply click "R" and "W".
They stand for "Read" and "Write". Reading in this case means that it will apply the automation to the track. If you leave "R" off after recording your automation, it simply won't work.
The "W" for writing really explains itself. It is the "record" button for your automation.


Now the fun part starts!
Automation will basically record everything you do in your mixer, or anything attached to your track.


Back to my plan: I wanted to add some manual panning for my first track..
All i do is make sure "R" and "W" are on and start playing the track ...
 

( so do NOT press the record button in the transport bar...!) Always remember to turn off R&W after you finish automating your track, in any DAW... As Loudon pointed out during the lesson about this, its very easy to forget and then you have to start all over again.!
 After i am done, this will show in my automation track:
You can see the lines i "drew" by panning from left to right.

Cubase automatically saw this was a panning automation, and it will show up next to the R&W in the automation strip. You can give it preset functions like panning, fading etc.

Of course it is possible to edit these lines. For this "R" ( read) has to be on again, and then i can edit the points Cubase used to connect my parameters. I simply drag the points to where i want and that's it!


 This is a recorded fader automation...Same principle. It connects what changes in parameters you give it, and you can always edit those points.


The great thing about automation is that it also works great for example plugins.
If i want to introduce lets say a reverb halfway down the track, i can turn on and change parameters in the plugin. i would simply have to make sure the plugin is active before i start automation, and the moment i want to add some reverb to the track, i simply add ( in this case) "mix" so i can manually 
decide where and how much reverb to add.

As you can see these kinds of automation are really easy to use for post recording editing.


I really love automation in Cubase because it is so easy to use.
It is a great way to dynamically mix your tracks.
If nothing else, it looks really great to see all the faders move automatically in the mix!


I hope this was a useful lesson, i enjoyed making it. If you have any comments, do not hesitate to let me know in the forums or directly on this blog.
Thanks again for taking the time to read it! Hope everyone is doing well with their assignments.

Hans Hendriksen


Wednesday, February 12, 2014

Second week assignment


                                Setting up a project in Cubase 5


Hi fellow students.
Thanks for taking time to see my next assignment. I hope your assignments all went well!

My lesson today will show how to set up and prepare a project in Cubase, my Digital Audio Workstation.

I have been using Cubase for quite a while and i am starting to know it pretty well. 
I have however been seeing a lot of new things to master in Loudon's lessons, which is great since it is an important reason why i decided to enroll on Coursera. 
Since i am completely self taught ( until now), one always assumes to know everything and be pretty good with using software like this. The lectures made it clear i have a lot to learn!

I am however excited to try to teach what i do know, and this lesson is part of that.

Setting up a project in Cubase 5 works like it does in most DAW's from what i have seen, but sometimes the order in which you do things differs a little from other software.

The most important thing before setting up a project is to make sure the hardware is working well.
The better you have this prepared and working, the easier the project and recording will go.
To make sure i am using the right drivers and hardware, i go to the devices setup screen:


In this menu, i can choose the driver handling the negotiation from input interface to audio interface, and the handling within the DAW once that signal reaches the track its going to end up on.


I choose VST audio system to see which driver it is using, in this case it already shows the correct driver,
ASIO4ALL. I use this (free) driver to work with because it is easy to set up and it gives me low latency.
 Then i click "asio4all v2" underneath VST audio system and it will show me this screen:
It will show the different in and out connections involved in Cubase with this driver. I can also choose the control panel of the driver itself:

 This is really the most important screen to set up. It allows me to choose my I/O, make certain driver changes and most important allows me to set the amount of samples. (io2 is my Alesis input interface)

For recording i use 128 or 256 samples, for post recording editing i use 512 or 1024 samples.
After that's set i can start setting up the project!


What i first do is to make sure i start with a clean sheet.
When you open Cubase 5 it comes up with a menu what you want to open

In this case i want to set up a whole new project so i will choose "empty". There are some templates included by Cubase and myself that i use to set up a project with certain parameters set up already, which is easy in some cases. But i usually start from scratch, which means i have to set up the tracks myself.

The next screen is an important one, it asks you to specify the location of the project and its subfolders.
I use one folder for all my Cubase projects/songs so i select that folder on my computer.

This way i always know where my files are. I never change the structure of the folders or subfolders, because it leads to a lot of confusion for both DAW and myself!

Once that is done, the project screen will appear. I see this as my "worksheet".


Once i am here, there are a few things to do next before i can continue.
First, i need to set up the sample rate, bit rate and file format.

I click on "project" in the menu and choose "project setup"
The screen that appears will allow me to setup a number of things, among the parameters i just mentioned:

I set the sample rate rate to 48K, my bit rate on 24 bit quality and the file format on the Wave format.
I always have used the wave format, i could have chosen AIFF as well here.
There is also the possibility to give up how long the project is , which only works if you have a global idea about how long it actually will be.


If you close the screen with ok, you can see your settings in the project screen


My rule is to setup the click and transport next, so you won't have to worry about that once you create a track. The transport bar holds all the options to set that up.


I use a modifying key ( control) and click on tempo and click to get these sub-menu's
The first one allows me to setup the click, pre count and click volume.


In the Tempo menu i can choose the speed of the click and beat ( usually in Beat Per Minute) simply by dragging up and down the blue bar.


 Everything is now setup properly to create a track.

I simply right click in the project and choose "add track"

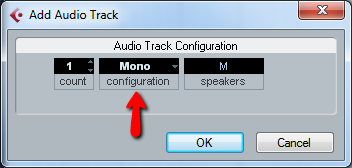
In this case i choose "audio track" and it then asks me to choose whether it should be mono or stereo:


Since i am recording a single channel with a single instrument, i choose mono.


I now have a new project set up with the correct digital audio preferences set. My drivers are set up correct and i have added an audio track that is ready to record. 

Now before i go on, i make sure i give my project a name.
I click on save in the menu, and it prompts me to give a project name.

I give it a name and i save the file in the same folder i had to specify earlier.
Now i know all the relevant files are in the same folder and subfolders.

This is how i setup a project in Cubase. Keeping the same routine to setup recording works well for me.
It prevents unwelcome suprises and keeps your mind on the most important thing, the creative process!!

I hope you enjoyed my lesson about setting up my DAW for recording. Thanks for your time and good luck with your assignments!


Hans Hendriksen


Wednesday, February 5, 2014

Hi!

My name is Hans, i am from Chicago and i decided to do my first assignment 
as a blog. I've always felt comfortable writing about subjects i'm interested in, 
so i think for me this is a good start. 

My lesson today will be about my favorite recording microphone, and how that relates 
to the lesson we had about microphones.

As we saw in the lecture, it's very important to decide which microphone you use for 
the things you want to record with it. 

First of all you have to consider the environment you're in. 
In my case that's a room that on the front (window) side has a lot of traffic and a sidewalk 
directly in front of me. Not ideal, by far.


Furthermore there's radiators and other sounds that i have to try not to record.

I'm sure those of you who have used microphones in a home setting know what i mean..
The microphone that i keep going back to is the Sure SM57


                                   The SM57 is a dynamic microphone with a cardioid polar pattern.
                                       ( the heart shaped figure in front of the microphone)


This means that the microphone has to point towards the object that you're going to record.
At an angle of around 150 degrees the pickup drops off considerably.
This makes it very useful to prevent it picking up those ambient sounds i just mentioned.


The challenge with this microphone is that you have to set it up and place it very carefully to get good results.
I had to get used to what the microphone requires for a good recording and once i got comfortable with that, i started using it more often. As i said, it now is my go to mic.

The microphone is also a favorite because it's so versatile. I record acoustic and electric guitar on it, use it to record percussion and drums and i even use it for vocals.  
Although it is not perfectly suited for recording acoustic guitar, it does a perfect job for me given the 
environment i'm in. In theory it records best with sounds more solid that acoustic guitar, but it is very flexible
when you need to give it a bit more microphone pre-amp for this purpose. 

It has a frequency response of 40 to 15000 herz, which for me is great for my style and instruments.

It doesn't pick up well in the frequencies below or above that, which again helps to eliminate unwanted sound.

I also use it often to record electric guitar. I normally place the microphone exactly in front of the speaker cone, but i can dramatically change the timbre of the sound by placing it at an angle or put some more distance between the speaker and the microphone.

                                          Directly in front ..
                                          ..and at an angle with more distance


This is very useful when you are trying to find the right "color" of the sound. I always try to consider the "air" in between the microphone and whatever i record. These terms of course relate directly to "Timbre" and "Amplitude" respectively in the video lectures we have seen on microphones. 

I use the SM57 with my audio interface, i connect an XLR cable to the interface directly or through a directbox. I also record through direct input (DI) with a semi acoustic guitar, and record it with the SM57
at the same time. This gives great options in my DAW, for i can use both the electric and acoustic input at the same time or not. 
If i use them together it gives me a lot more options to change the dynamics and overall sound of the recording.


Well, this was my first assignment. I really enjoyed making it! I love recording and talking about 
"sound", so this wasn't a chore for me at all. I hope you enjoyed it and found it interesting.
Thanks for taking the time to read it!


Hans Hendriksen